The first time I made a Skellington Cheese Ball, my kitchen looked like a mad scientist’s lab—black olives rolling everywhere, cream cheese on my hands, and my kids giggling at my “spooky” handiwork. The smell of sharp cheddar and green onions filled the room, and honestly, I felt a little like Jack Skellington bringing Halloween to life in my own house! There’s something about a Halloween party that just begs for a showstopper appetizer—something fun, a little creepy, and so delicious you’ll have guests hovering near the snack table all night. That’s where this Skellington Cheese Ball comes in. It’s creamy, savory, and loaded with flavor, but it’s also a visual treat (and a conversation starter). Whether you’re hosting a big bash or a cozy movie night, this cheese ball will steal the show.
I first stumbled onto the idea during a marathon “Nightmare Before Christmas” binge. My youngest is obsessed with Jack Skellington, and let’s face it—so am I. So when I needed a crowd-pleasing appetizer for our neighborhood Halloween party, I knew a Skellington Cheese Ball was the answer. Over the years, I’ve tweaked the recipe to get just the right combo of tang, creaminess, and sturdiness (so it doesn’t collapse halfway through the party). Plus, decorating it with olives and food-safe markers is honestly just plain fun—no fancy skills required.
This cheese ball is perfect for busy hosts, picky eaters, and anyone who wants a little Halloween magic with their snacks. It’s packed with simple ingredients, comes together quickly, and can easily be made ahead. Trust me—I’ve made this recipe a dozen times, and it’s always the first thing to disappear. If you’ve ever been intimidated by themed party food, this Skellington Cheese Ball will change your mind. Let’s get spooky, cheesy, and a little bit silly!
Why You’ll Love This Skellington Cheese Ball Recipe
- Quick & Easy: This cheese ball comes together in about 20 minutes (plus chilling time), so you won’t be stuck in the kitchen all afternoon.
- Simple Ingredients: No weird specialty items here—just classic cream cheese, cheddar, and a handful of pantry staples.
- Perfect for Halloween Parties: Whether you’re hosting a big bash or a movie marathon, this appetizer is guaranteed to get some laughs (and lots of bites).
- Crowd-Pleaser: Kids love the fun shape, adults love the bold flavors, and picky eaters love the familiar ingredients. It’s basically a win for everyone.
- Unbelievably Delicious: The creamy, tangy cheese ball pairs perfectly with crunchy crackers, veggies, or pretzels. The shredded cheddar and green onions add layers of flavor you won’t get from a store-bought cheese ball.
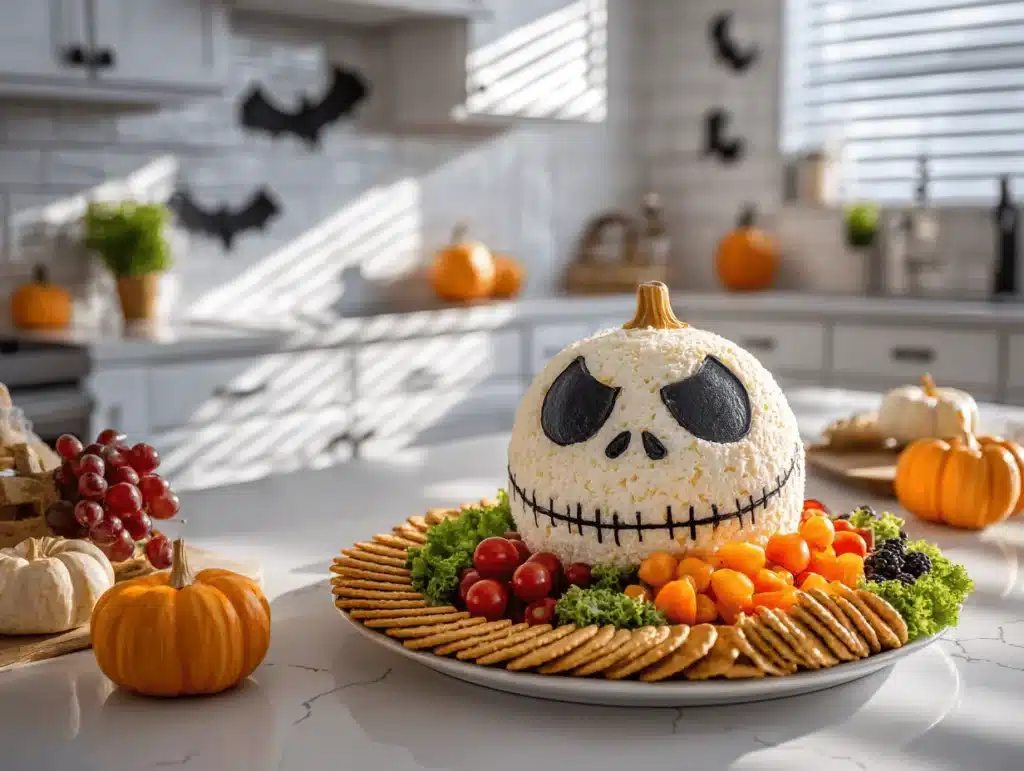
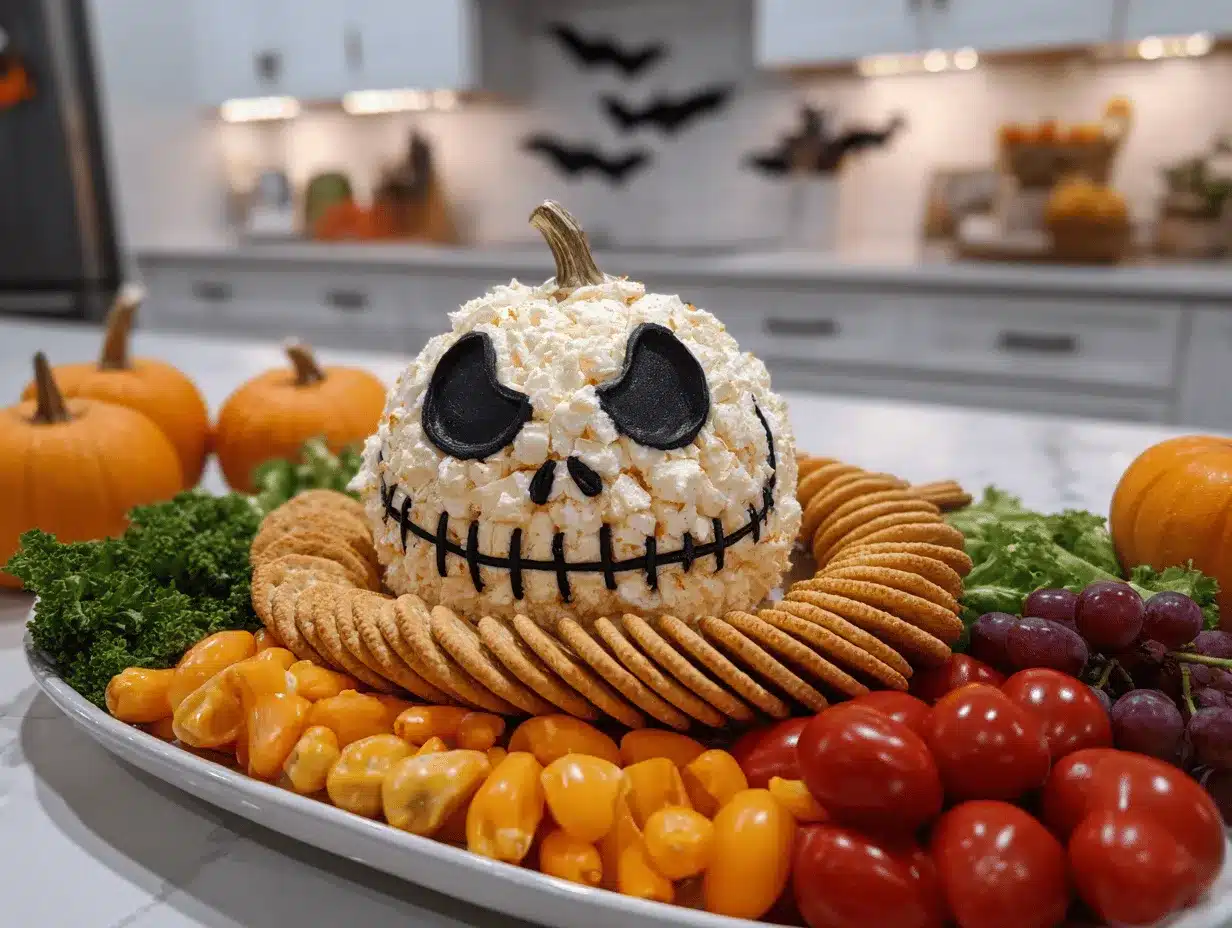
Here’s the thing: I’ve made a lot of cheese balls in my day, but this one is special. Blending the cheeses makes it ultra-smooth, and rolling it in a thin layer of mozzarella gives it that classic Skellington “skull” look. A few artfully placed olives (or even edible markers) create the iconic grin and hollow eyes. It’s not just another cheese ball—it’s the one your guests will be snapping photos of for Pinterest and Instagram.
After hosting Halloween parties for years, I know what works and what flops. This recipe is the kind that gets people talking, laughing, and coming back for seconds. It’s comfort food—just a little bit spooky. Perfect for impressing guests without the stress (especially if you’ve ever tried piping elaborate decorations on cupcakes—this is way easier, trust me).
When you need a make-ahead, crowd-friendly appetizer that’s got personality and great flavor, the Skellington Cheese Ball delivers. It’s the recipe that disappears before the party is over, and honestly, it’s the one I look forward to making every October.
Ingredients Needed
This Skellington Cheese Ball recipe uses tried-and-true ingredients for the perfect creamy, tangy bite—and all the spooky fun. Most are pantry staples, so no last-minute grocery runs!
- For the Cheese Ball:
- 16 oz (450g) cream cheese, softened (full-fat works best for structure)
- 2 cups (200g) shredded sharp cheddar cheese (gives great flavor and color)
- 1/2 cup (50g) shredded mozzarella cheese (for a smooth, pale “skull” outer layer)
- 1/4 cup (25g) grated Parmesan cheese (adds a savory kick—optional, but I love it!)
- 1/4 cup (30g) finely chopped green onions (for a fresh bite)
- 1/2 tsp garlic powder (not garlic salt—trust me, it’s better for balance)
- 1/4 tsp onion powder (adds depth without overpowering)
- 1/2 tsp Worcestershire sauce (brings a subtle tang)
- 1/4 tsp black pepper (freshly ground, if possible)
- Salt to taste (usually about 1/2 tsp, but adjust for your cheeses)
- For Decorating:
- 12-16 large black olives, sliced (for eyes, nose, and mouth details—pitted is easiest)
- Edible black food marker or gel (to draw details if you prefer)
- Extra shredded mozzarella (for touch-ups or a smoother finish)
- Parsley or chives, optional (for garnish around the “skull”)
- For Serving:
- Assorted crackers (I love wheat, butter, and rye for texture)
- Pretzel sticks or rods
- Fresh veggie sticks (carrots, celery, cucumber—it’s Halloween, so go wild!)
Ingredient Notes & Substitutions:
- If you need a gluten-free cheese ball, double-check your Worcestershire sauce and crackers—some brands contain gluten.
- For dairy-free: Use plant-based cream cheese and vegan cheddar shreds. The flavor will be slightly different but still delicious.
- Add diced jalapeños or smoked paprika for a kick, or swap green onions with chives if you want a milder taste.
- Don’t have a food marker? Use finely chopped olives or roasted red peppers for details.
- Want a nutty twist? Roll the cheese ball in finely chopped pecans before adding the mozzarella layer. It’s not classic Skellington, but it tastes fantastic!
For best results, use block cheese you shred yourself—the pre-shredded stuff can sometimes be a little dry. And if you’re like me, you’ll end up snacking on the ingredients while you prep. No shame!
Equipment Needed
- Mixing bowl: Large enough to hold all your cheese ball ingredients. I use glass so I can see the mixture clearly.
- Hand mixer or stand mixer: Essential for getting that creamy, smooth texture. A sturdy spatula works if you don’t have a mixer, but your arms might get a workout!
- Plastic wrap: For shaping and chilling the cheese ball. Wax paper works in a pinch, but plastic is easier for molding.
- Sharp knife: For slicing olives and prepping veggies.
- Cutting board: I like using a non-slip board for safe and easy chopping.
- Small offset spatula or butter knife: For smoothing the cheese ball and adding final touches.
- Serving platter: Preferably something flat and white to make the Skellington “skull” stand out. A round plate works, too.
- Edible food marker (optional): For drawing details. If you don’t have one, use thin strips of olives or roasted peppers.
If you’re on a budget, don’t worry—no fancy tools required. I’ve even shaped cheese balls using my clean hands and a regular dinner knife. For cleanup, run warm water over your mixer attachments and spatulas right after use; cheese can get sticky if it sits.
Pro tip: If you want perfectly smooth cheese balls, chill your mixing bowl and utensils for a few minutes before starting. It helps keep everything cool and easy to work with.
Preparation Method
- Prep Your Ingredients:
- Set out the cream cheese to soften for 15-20 minutes. Shred cheddar and mozzarella (if using block cheese). Slice olives for decorating.
- Finely chop green onions and any herbs you’re using for garnish.
- Mix the Cheese Ball:
- In a large mixing bowl, add 16 oz (450g) softened cream cheese, 2 cups (200g) shredded cheddar, 1/2 cup (50g) shredded mozzarella, 1/4 cup (25g) Parmesan, 1/4 cup (30g) green onions, 1/2 tsp garlic powder, 1/4 tsp onion powder, 1/2 tsp Worcestershire sauce, 1/4 tsp black pepper, and salt to taste.
- Beat with a hand mixer (or stand mixer) on medium until fully combined and creamy, about 2 minutes.
- If mixing by hand, mash everything with a sturdy spatula until smooth. Don’t worry if it looks a little chunky—it’ll smooth out as you shape it.
- Shape the Cheese Ball:
- Lay out a large sheet of plastic wrap. Spoon the cheese mixture onto the center and gather the wrap around it, shaping into a round ball about 5-6 inches (13-15cm) across.
- Twist the plastic wrap closed and gently shape into a skull-like oval. Refrigerate for 1-2 hours to firm up. (If you’re short on time, pop it in the freezer for 20-30 minutes. Just don’t forget it!)
- Create the “Skull” Coating:
- Once chilled, unwrap the cheese ball and roll it in 1/2 cup (50g) shredded mozzarella, pressing gently to cover the surface. Smooth with a spatula or your hands for a seamless “skull” look.
- If needed, patch any bare spots with extra cheese.
- Decorate the Skellington Face:
- Use sliced black olives for the eyes (two large rounds), nose (two small ovals), and mouth (a row of thin slices for the stitched smile).
- For extra detail, use an edible black food marker or gel to draw stitches and outlines. If you’re feeling crafty, add eyebrows or cheekbones.
- Arrange parsley or chives around the base for a “graveyard” effect.
- Serve:
- Transfer the finished Skellington Cheese Ball to a serving platter. Surround with crackers, pretzels, and veggie sticks.
- Keep chilled until ready to serve. If making ahead, cover loosely with plastic wrap and refrigerate for up to 24 hours.
Troubleshooting Tips:
- If the cheese ball feels too soft, chill longer or add a bit more shredded cheese to firm it up.
- Olives sliding off? Pat the cheese ball surface dry before decorating, or use a dab of cream cheese as “glue.”
- Cracks in the surface? Patch with extra mozzarella and smooth out with a spatula.
<lihaving hands="" li="" lightly="" prevent="" shaping?="" sticking.
Cooking Tips & Techniques
Let’s face it—cheese balls can be fickle. Here’s what I’ve learned from my own kitchen adventures:
- Chill for Structure: Don’t skip the chilling step, especially if you want clean, smooth edges for your Skellington “skull.” If you’re in a hurry, 30 minutes in the freezer works, but don’t let it freeze solid.
- Use Full-Fat Dairy: Low-fat cream cheese can make the cheese ball too soft and prone to cracking. Trust me, I tried it once and ended up with a sad, melty mess.
- Mix Well, But Don’t Overwork: Over-mixing can make the cheese ball dense. Stop when everything is evenly combined.
- Decorating Tricks: If olives won’t stick, lightly score the surface with a knife or use a little extra cream cheese as adhesive. For neat lines, use a food marker (but test it on a small area first).
- Make-Ahead Magic: Cheese balls are actually better when made ahead—the flavors meld and the texture firms up. Just decorate right before serving for the freshest look.
I once tried to “shortcut” the chilling time and ended up with a cheese puddle on my platter—learn from my mistakes! And don’t stress about perfection. Jack Skellington is a little quirky, and your cheese ball should be, too.
If you’re multitasking, prep your crackers and veggies while the cheese ball chills. That way, everything’s ready at once. For consistent results, measure all ingredients with a kitchen scale—no guessing required.
Variations & Adaptations
Want to switch things up? Here are some fun ways to make the Skellington Cheese Ball your own:
- Spicy Skellington: Add 1-2 tablespoons diced jalapeños or a pinch of cayenne pepper to the cheese mixture for a little heat.
- Gluten-Free Version: Use gluten-free Worcestershire sauce and serve with gluten-free crackers or cucumber slices.
- Vegan Adaptation: Swap in vegan cream cheese and dairy-free cheddar shreds. Use vegan-friendly olives and crackers for serving.
- Seasonal Twist: Mix in roasted pumpkin puree and a dash of nutmeg for a subtle autumn flavor. (I did this last year, and it was a hit with the grown-ups!)
- Bacon Lovers: Fold in 1/4 cup (30g) cooked, crumbled bacon for a smoky edge. Just be sure to serve quickly; bacon can soften the texture over time.
For different cooking methods, you can shape mini cheese balls for individual servings, or press the mixture into a mold for a more defined “skull.” If you’re serving to folks with allergies, swap green onions for chives or omit nuts entirely. I once made a batch with smoked gouda instead of cheddar, and it was gone in minutes!
Customizing is part of the fun—don’t be afraid to get creative with your Skellington Cheese Ball. It’s Halloween, after all!
Serving & Storage Suggestions
The Skellington Cheese Ball is best served chilled, straight from the fridge. Let it sit out for 15-20 minutes for perfect spreadability. Arrange on a white or black platter (for max Halloween vibes), surrounded by crackers, pretzels, and veggie sticks. I like adding a “graveyard” garnish with parsley or chives. If you want to really wow your guests, add edible flowers or fake cobwebs (just keep them off the cheese ball itself, of course).
For beverages, pair with apple cider, sparkling water, or even a pumpkin beer—something light to balance the richness. If you’re serving this as part of a bigger spread, set it next to roasted pumpkin seeds, deviled eggs, or a spooky fruit tray.
Storage Instructions: Wrap leftovers tightly in plastic wrap or store in an airtight container. Refrigerate for up to 3 days. For longer storage, freeze the undecorated cheese ball for up to 2 weeks—thaw overnight in the fridge, then decorate before serving. To reheat (if you must), let it come to room temp; microwaving isn’t recommended, as it can separate the cheeses.
Flavor tip: The cheese ball actually tastes better on day two, as the flavors meld together. Just freshen up the decorations before serving again!
Nutritional Information & Benefits
Here’s a rough breakdown per serving (about 2 tablespoons):
- Calories: 90
- Fat: 7g
- Protein: 5g
- Carbohydrates: 2g
- Sodium: 150mg
Health Benefits: Cheese balls offer a good dose of calcium and protein (thanks to the dairy). Using green onions adds a little vitamin C and fresh flavor. For lower carb diets, serve with sliced veggies or gluten-free crackers. If you have dairy sensitivities, swap for plant-based cheeses; just note the flavor will be different.
Allergen Notes: Contains dairy and may contain gluten, depending on your serving choices. Always check your ingredient labels if allergies are a concern.
From a wellness perspective, a cheese ball like this is all about balance—enjoy it as part of your party spread, and pair with fresh veggies for a lighter bite. I love knowing my kids are getting real ingredients while having Halloween fun!
Conclusion
Honestly, the Skellington Cheese Ball is what Halloween dreams (or nightmares?) are made of—creamy, tangy, and just a little bit spooky. It’s the kind of recipe you can throw together in minutes but looks like you spent hours, and your guests will be talking about it long after the party’s over. Plus, it’s super easy to customize for tastes, diets, or your own creative flair.
I make this every October because it never fails to delight, and it’s just plain fun to assemble and decorate. Whether you’re hosting a crowd or a cozy family night, this cheese ball will steal the show. So go on—get your hands a little messy and bring some Skellington magic to your next party!
Try it out, share your creative twists in the comments, and tag me if you post your masterpiece on Pinterest or Instagram. I can’t wait to see your spooky creations—happy haunting and happy snacking!
Frequently Asked Questions
How far in advance can I make the Skellington Cheese Ball?
You can make the cheese ball up to 24 hours ahead. Just hold off on decorating until the day of your party for the freshest look.
Can I freeze the cheese ball?
Yes! Freeze the undecorated cheese ball for up to 2 weeks. Thaw overnight in the fridge, then decorate before serving. Don’t freeze with olives or food marker details—they won’t hold up.
What’s the best way to get the cheese ball smooth and skull-like?
Use softened cream cheese, mix thoroughly, and chill well before shaping. Rolling in shredded mozzarella helps cover imperfections and gives a pale “skull” appearance.
What crackers and veggies go best with this appetizer?
I like wheat crackers, pretzel sticks, and fresh veggie slices (carrots, celery, cucumber). Anything crunchy works great for scooping!
Can I make this cheese ball nut-free?
Absolutely. Just skip any nut toppings or mix-ins. The classic recipe is naturally nut-free, but always check ingredient labels for cross-contamination if allergies are a concern.
Pin This Recipe!
Skellington Cheese Ball Recipe: Easy Halloween Party Appetizer for Crowds
- Total Time: 1 hour 20 minutes (including chilling)
- Yield: 10-12 servings 1x
Description
This Skellington Cheese Ball is a creamy, tangy, and spooky appetizer perfect for Halloween parties. Decorated to look like Jack Skellington, it’s a crowd-pleaser that’s easy to make and fun to serve.
Ingredients
- 16 oz cream cheese, softened
- 2 cups shredded sharp cheddar cheese
- 1/2 cup shredded mozzarella cheese (plus extra for coating)
- 1/4 cup grated Parmesan cheese (optional)
- 1/4 cup finely chopped green onions
- 1/2 tsp garlic powder
- 1/4 tsp onion powder
- 1/2 tsp Worcestershire sauce
- 1/4 tsp black pepper
- Salt to taste (about 1/2 tsp)
- 12–16 large black olives, sliced (for decorating)
- Edible black food marker or gel (optional, for decorating)
- Parsley or chives, optional (for garnish)
- Assorted crackers (wheat, butter, rye)
- Pretzel sticks or rods
- Fresh veggie sticks (carrots, celery, cucumber)
Instructions
- Set out cream cheese to soften for 15-20 minutes. Shred cheddar and mozzarella if using block cheese. Slice olives for decorating. Finely chop green onions and any herbs for garnish.
- In a large mixing bowl, add softened cream cheese, shredded cheddar, shredded mozzarella, Parmesan, green onions, garlic powder, onion powder, Worcestershire sauce, black pepper, and salt.
- Beat with a hand mixer or stand mixer on medium until fully combined and creamy, about 2 minutes. If mixing by hand, mash everything with a sturdy spatula until smooth.
- Lay out a large sheet of plastic wrap. Spoon the cheese mixture onto the center and gather the wrap around it, shaping into a round ball about 5-6 inches across.
- Twist the plastic wrap closed and gently shape into a skull-like oval. Refrigerate for 1-2 hours to firm up, or freeze for 20-30 minutes if short on time.
- Once chilled, unwrap the cheese ball and roll it in extra shredded mozzarella, pressing gently to cover the surface. Smooth with a spatula or hands for a seamless ‘skull’ look.
- Use sliced black olives for the eyes (two large rounds), nose (two small ovals), and mouth (a row of thin slices for the stitched smile). Use edible black food marker or gel for extra detail if desired. Arrange parsley or chives around the base for garnish.
- Transfer the finished cheese ball to a serving platter. Surround with crackers, pretzels, and veggie sticks. Keep chilled until ready to serve. If making ahead, cover loosely with plastic wrap and refrigerate for up to 24 hours.
Notes
For best results, use full-fat cream cheese and freshly shredded cheese. Chill well for structure before shaping and decorating. If olives won’t stick, use a dab of cream cheese as glue. Cheese ball can be made ahead and decorated just before serving. For gluten-free, check Worcestershire sauce and serve with gluten-free crackers. Nut-free as written; always check labels for allergies.
- Prep Time: 20 minutes
- Cook Time: 0 minutes
- Category: Appetizer
- Cuisine: American
Nutrition
- Serving Size: About 2 tablespoons per serving
- Calories: 90
- Sodium: 150
- Fat: 7
- Carbohydrates: 2
- Protein: 5
Keywords: Halloween, cheese ball, party appetizer, Jack Skellington, spooky snacks, crowd-pleaser, easy appetizer, make-ahead, vegetarian, nut-free