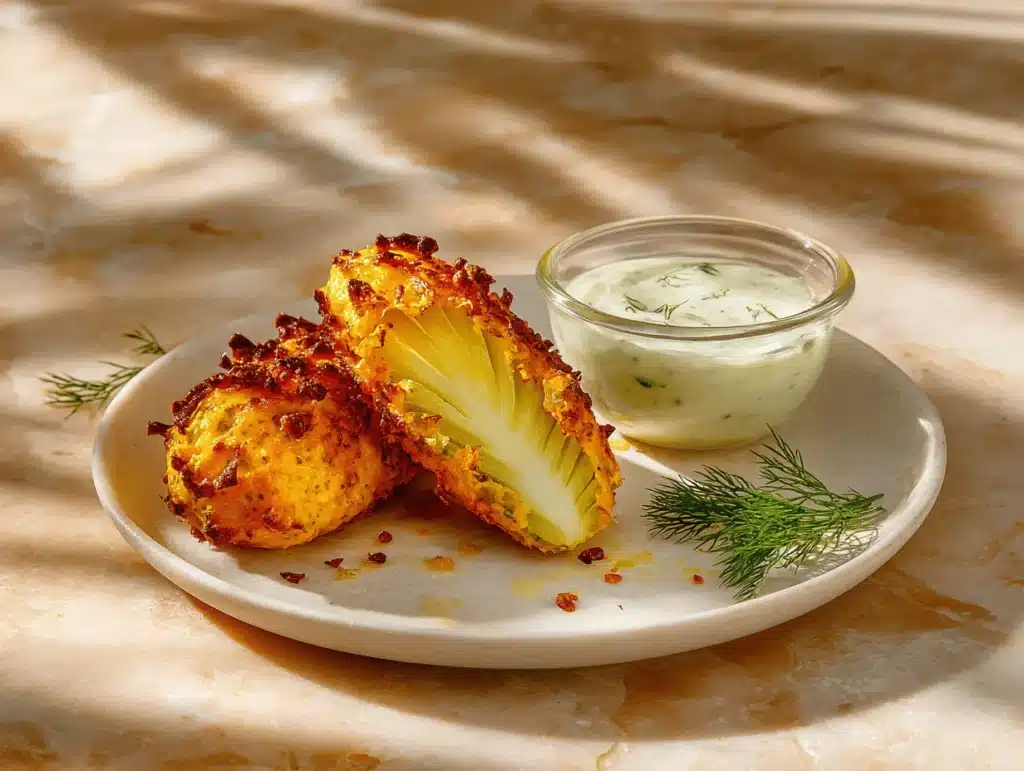
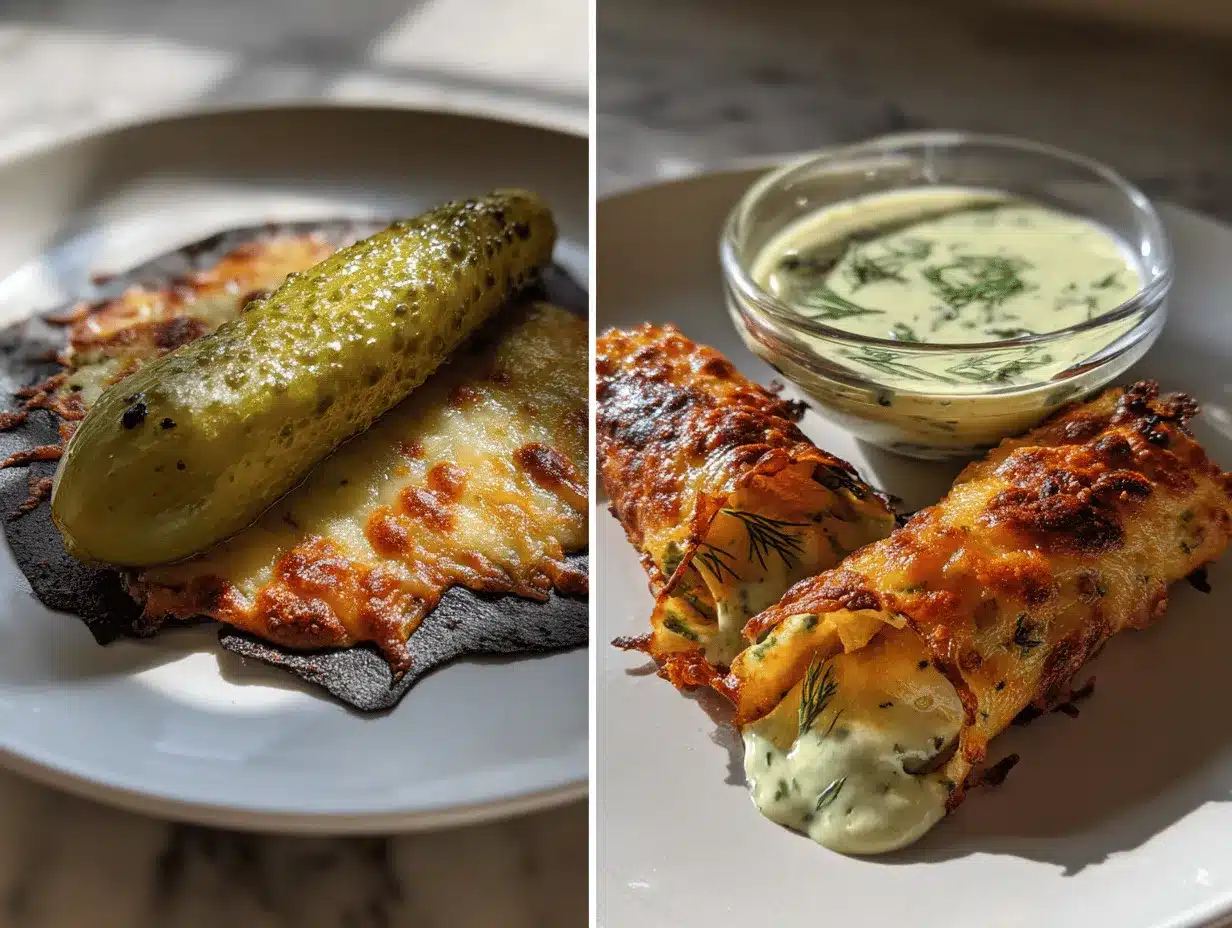
The first time I tried the viral chickle recipe—crispy cheese-wrapped pickles—my kitchen smelled like a savory snack shop, and honestly, I was hooked before my first bite. Imagine biting into gooey, golden cheese with a bright, tangy pickle center. The crunch echoes, the saltiness hits, and you just want more (seriously, I’ve made these way too many times!). I stumbled across chickle on social media, and let’s face it, the idea of wrapping pickles in crispy cheese sounded bizarre but weirdly genius.
It all started on a lazy afternoon when I was craving something salty but didn’t want to fuss over complicated snacks. I had cheese and pickles—a match made in snacker heaven. With just a skillet and a few minutes, the chickle recipe was born in my kitchen, and it’s now a staple for movie nights, game days, and those “I need something crunchy” afternoons. What I love is how simple yet satisfying it is. The cheese melts and crisps up, hugging the pickle, and you get this perfect balance of flavors and textures. Plus, it’s gluten-free and keto-friendly, so everyone wins.
If you love pickles, cheese, and snacks that take almost zero effort, you’re in for a treat. This chickle recipe is more than just a fun food trend—it’s comfort food with a twist, and it’s ridiculously easy to customize. Whether you’re feeding a crowd or just yourself, these crispy cheese-wrapped pickles deliver big on flavor and fun. I’ve tested every cheese, every pickle shape, and trust me, you’ll want to make a double batch!
Why You’ll Love This Chickle Recipe
Let me be real: chickle is snack magic. After making this recipe dozens of times (and serving it at more than a few parties), I can say with total confidence—this is not your average pickle snack. Here’s why:
- Quick & Easy: You need less than 10 minutes from start to crispy crunch. Perfect for spontaneous cravings or when guests drop by unannounced.
- Simple Ingredients: No weird stuff—just cheese and pickles. I bet you already have them in your fridge.
- Perfect for Every Occasion: Think game day, movie night, lunchbox treats, midnight snacks, or even as a fun appetizer at parties.
- Crowd-Pleaser: Kids, adults, even self-proclaimed pickle skeptics have given these two thumbs up. My picky eater nephew actually requests them!
- Unbelievably Delicious: The combo of crunchy cheese and zesty pickle is addictive. One bite and you’ll know why this chickle recipe went viral.
What sets this chickle recipe apart is the technique—melting cheese till it crisps up, then wrapping it around a pickle for that iconic snap. You can use sliced cheese, shredded cheese, and even switch up your pickle style (chips, spears, or coins). It’s flexible, fast, and forgiving. Honestly, I’ve burned a few batches, undercooked others, and every time, the flavor is still spot-on. And you know what? That first crunchy bite always makes me smile.
It’s not just food—it’s a moment. Whether you’re making chickle for yourself or sharing with friends, it turns snacking into an experience. Comfort food, but with that viral twist that makes it special. You’ll close your eyes, savor the flavor, and probably want to make it again tomorrow.
Ingredients Needed for Crispy Cheese-Wrapped Pickles (Chickle Recipe)
This chickle recipe is all about simplicity and bold flavor. You only need a handful of ingredients, most of which are probably hanging out in your fridge already. Here’s what you’ll need:
- Cheese (sliced or shredded, about 1 slice or 30g per chickle): Cheddar, mozzarella, provolone, or Colby Jack all work. (Cheddar gives the best crunch, in my opinion! I reach for Tillamook or Kraft slices for consistency.)
- Pickles (whole, spears, chips, or coins): Dill pickles are classic, but bread & butter pickles add a sweet-tangy twist. (Claussen or Grillo’s are my go-to brands for crunch.)
- Cooking Spray or Butter (optional): For greasing the pan and extra flavor. (Butter gives a richer taste, but spray is quick and easy.)
- Seasonings (optional): Garlic powder, black pepper, smoked paprika, or Everything Bagel seasoning for a flavor boost. (A sprinkle of paprika adds a smoky note.)
If you want to mix things up, there are plenty of substitutions:
- Dairy-Free Cheese: Use vegan cheese slices or shreds. (Daiya and Violife melt and crisp nicely.)
- Low-Sodium Pickles: For a lighter option, grab low-salt pickles or homemade cucumber spears.
- Spicy Pickles: Add jalapeño pickles for a kick—so good if you love heat!
- Gluten-Free: This recipe is naturally gluten-free, so no worries for those with celiac or gluten sensitivity.
Grouping ingredients by function makes prep a breeze:
- For the Chickle Base: Cheese + Pickles
- For Extra Flavor: Seasonings (totally optional, but highly recommended)
- For Cooking: Spray or butter
I’ve tried all sorts of cheeses and pickles here, from fancy aged cheddar to basic store-brand slices. Honestly, every version is tasty, but if you want the ultimate crunch, pick a cheese that crisps up well—cheddar never lets me down. And when you’re picking pickles, look for ones that are firm and not too wet. (Patting them dry helps prevent soggy chickle!)
Equipment Needed
Making chickle doesn’t require fancy gadgets. You only need a few basic kitchen tools:
- Nonstick Skillet or Frying Pan: A must for easy cheese crisping and mess-free cleanup. (I use an 8-inch nonstick pan—works perfectly every time.)
- Spatula: For flipping and removing chickle. Silicone spatulas are gentle and prevent sticking.
- Tongs (optional): Great for wrapping the cheese around pickles without burning your fingers.
- Paper Towels: To pat pickles dry (trust me, it makes a difference).
- Small Plate or Cutting Board: For prepping and cooling chickle.
If you don’t have a nonstick pan, a well-seasoned cast iron skillet works (just add a little extra butter or spray!). I’ve tried making chickle on stainless steel, but cheese tends to stick and burn. Maintenance tip: Wipe your pan clean between batches for the crispiest results.
For budget-friendly options, any store-brand nonstick skillet will do the job. And if you’re making a big batch, grab a second pan to speed up the process. Honestly, the simpler your setup, the better—less cleanup, more snacking!
Preparation Method
Ready to make the crunchiest chickle ever? Here’s how I do it, step by step:
- Prep the Pickles (2 min): Remove pickles from jar and pat dry with paper towels. (This keeps the cheese from getting soggy.) Slice pickles into coins or spears if needed—about 2-3 inches long is perfect.
- Heat the Pan (1 min): Preheat a nonstick skillet over medium heat. Lightly spray with cooking spray or add 1/2 tsp of butter for extra flavor.
- Add the Cheese (1 min): Place a slice of cheese (or about 30g shredded) directly on the pan. Cheese will start to melt, then bubble. Wait until the edges turn golden and crispy—about 30-45 seconds.
- Place the Pickle (1 min): Carefully set a dry pickle spear or coin in the center of the melted cheese. Let it sit for a few seconds so the cheese wraps around the pickle naturally.
- Wrap and Crisp (2 min): Using a spatula or tongs, gently fold the cheese around the pickle. Press lightly to seal. Cook another 30-60 seconds until the cheese is deep golden and crisp (you’ll smell the toasty cheese!).
- Remove and Cool (1 min): Transfer chickle to a plate lined with paper towels. Let it cool for 1 minute—this helps the cheese set and stay extra crispy.
- Repeat: Wipe the pan with a clean paper towel between batches to avoid burnt bits. Repeat steps for as many chickle as you want!
- Season and Serve: Sprinkle with garlic powder, pepper, or your favorite seasoning while hot. Serve immediately for maximum crunch.
Notes:
- If the cheese isn’t crisping, bump up the heat a little—but watch closely to avoid burning.
- Too much moisture from pickles can make cheese soggy, so pat them dry well.
- If cheese sticks to the pan, let it cool for 10 seconds before lifting—it should release easily.
- Feeling creative? Add a thin slice of ham or turkey before wrapping for a protein boost.
I’ve learned that patience is key—don’t rush the crisping stage! Listen for the sizzle, watch for that golden color, and you’ll nail it every time.
Cooking Tips & Techniques
Chickle might be easy, but there are a few tricks I’ve learned after lots of crispy, cheesy batches (and a few flops):
- Don’t Overcrowd the Pan: Cook one or two chickle at a time for best results. More than that, and the cheese won’t crisp evenly.
- Use Medium Heat: High heat burns cheese fast! Medium heat lets it melt, bubble, and crisp up perfectly. If you’re impatient (like me sometimes), resist cranking it up.
- Dry Pickles Thoroughly: Excess moisture leads to soggy cheese. I pat pickles dry, then let them air out a minute before wrapping.
- Flip with Confidence: Let the cheese set before wrapping—if you try too soon, it’ll fall apart. Look for deep golden edges before making your move.
- Cheese Choice Matters: Some cheeses (like cheddar or provolone) crisp better than soft cheeses. Avoid very processed slices—they can get greasy instead of crunchy.
- Season While Hot: Add spices or herbs right after cooking so they stick and flavor every bite.
My early chickle attempts were hit-or-miss—sometimes the cheese stuck, sometimes the pickles slipped out. I learned that letting cheese cool just a bit before lifting helps it release cleanly. If you get burnt bits, just wipe the pan and keep going. Chickle is forgiving!
If you want to multitask, prep all your pickles ahead and have cheese slices ready to go. That way, you can make a bunch in quick succession. And for consistency, use cheese slices that are uniform in thickness (pre-sliced is easiest). Trust me, a little patience goes a long way for that perfect crunch.
Variations & Adaptations
The chickle recipe is endlessly adaptable. Here are my favorite ways to switch things up:
- Spicy Chickle: Add a thin slice of jalapeño inside the cheese wrap, or use spicy pepper jack cheese. For heat lovers, this is a must-try!
- Dill-icious Chickle: Use fresh dill or dill pickle chips, and sprinkle a little dried dill on top after cooking. It tastes super fresh and herby.
- Ham & Cheese Chickle: Place a thin slice of ham under the cheese before adding the pickle. You get a mini sandwich vibe—so good for hearty snacking.
- Vegan Chickle: Use plant-based cheese and pickles. Vegan cheese won’t crisp quite like dairy, but it turns out chewy and delicious.
- Low-Sodium Chickle: Choose low-salt pickles and cheese. Tastes just as good, but a little lighter.
Cooking Methods:
- For oven chickle: Arrange cheese and pickles on a parchment-lined baking sheet. Bake at 400°F (200°C) until cheese is bubbling and crisp, about 8-10 minutes.
- For air fryer chickle: Place assembled chickle in the air fryer basket at 375°F (190°C) for 5-6 minutes.
I like to experiment with flavors—sometimes I add a little smoked paprika or swap in bread & butter pickles for a sweet twist. My personal favorite? Spicy chickle with a dash of garlic powder. It’s snack heaven!
Serving & Storage Suggestions
Chickle is best served hot, straight from the pan. The cheese is at peak crispiness, and the pickle still has that satisfying snap. Here’s how I like to serve and store them:
- Serve Immediately: Pile chickle on a serving plate, sprinkle with fresh herbs (like dill or parsley), and let everyone dive in. Perfect with spicy mustard or ranch dip.
- Pairings: Serve alongside potato chips, a cold beer, sparkling water, or as part of a snack platter with cured meats and olives.
- Storage: Cool leftover chickle completely, then layer between parchment paper in an airtight container. Store in the fridge up to 2 days.
- Freezing: Not recommended—the cheese loses its crunch and pickles get mushy. Best to make fresh!
- Reheating: Reheat in a nonstick skillet over medium heat for 1-2 minutes. Air fryer works too—just 2-3 minutes at 350°F (175°C). Avoid microwaving; it makes chickle rubbery.
- Flavor Development: Chickle is crispiest right away, but a day-old batch develops even more pickle tang (just less crunch).
For parties, make a big batch and keep warm in a low oven (200°F/95°C) until ready to serve. They’re always the first snack to disappear!
Nutritional Information & Benefits
Chickle is surprisingly light and fits into many diets. Here’s the nutritional breakdown per serving (one chickle):
- Calories: ~90
- Protein: 5g
- Fat: 7g
- Carbs: 1-2g
- Sodium: 320mg (varies by pickle and cheese)
Health Benefits:
- High Protein: Cheese adds a satisfying protein boost, perfect for low-carb or keto snacks.
- Low Carb & Gluten-Free: No breading, no flour—just cheese and pickles!
- Probiotics: Pickles are fermented, which supports gut health (if you use live-culture pickles).
Allergens: Contains dairy (unless using vegan cheese). Pickles may contain sulfites, so check labels if sensitive. From my wellness perspective, chickle is a smart snack—minimal ingredients, no added sugars, and it totally curbs salty cravings without derailing your diet.
Conclusion
Chickle is everything you want in a snack: quick, crunchy, cheesy, and totally crave-worthy. It’s my go-to for movie nights, lunchbox treats, and kitchen experiments gone right. Whether you stick to the classic or riff with your own twists, this chickle recipe is always a hit. The best part? It’s so easy, you’ll wonder why you didn’t try it sooner.
If you haven’t made crispy cheese-wrapped pickles yet, grab your cheese and pickles, fire up that skillet, and dive in. I love how customizable chickle is—make it spicy, sweet, meaty, or vegan. Every batch is a little different, and that’s the fun of it! Drop a comment if you try a new variation, share your favorite cheese, or tag me if you post your chickle on Pinterest. Happy snacking!
Trust me, once you taste that first bite, you’ll be hooked. Let’s make chickle the snack of the season!
FAQs About Chickle Recipe
What kind of cheese works best for chickle?
Cheddar, provolone, and Colby Jack crisp up beautifully. Sliced cheese is easiest, but shredded cheese works too—just spread it evenly for perfect crunch.
Can I use bread & butter pickles instead of dill?
Definitely! Bread & butter pickles add a sweet-tangy twist. Just pat them dry well, as they tend to be juicier.
How do I keep my chickle from getting soggy?
Pat pickles dry with paper towels before wrapping in cheese. Also, cook cheese until edges are deep golden and crispy before adding pickles.
Is chickle keto-friendly?
Yes, this chickle recipe is naturally low-carb and keto-friendly. Just use pickles and cheese that fit your carb goals.
Can I make chickle in advance?
Chickle is best served fresh for max crunch. You can prep the pickles and cheese ahead, but cook right before eating for best results!
Pin This Recipe!


Chickle Recipe: Easy Crispy Cheese-Wrapped Pickles for Snacking
- Total Time: 8 minutes
- Yield: 4 servings
Description
Chickle is a viral snack featuring crispy, golden cheese wrapped around tangy pickles. Quick to make, gluten-free, and keto-friendly, it’s the perfect crunchy treat for any occasion.
Ingredients
- Cheese (sliced or shredded, about 1 slice or 1 oz per chickle; cheddar, mozzarella, provolone, or Colby Jack)
- Pickles (whole, spears, chips, or coins; dill or bread & butter)
- Cooking spray or 1/2 tsp butter (optional, for greasing pan)
- Seasonings (optional: garlic powder, black pepper, smoked paprika, Everything Bagel seasoning)
Instructions
- Remove pickles from jar and pat dry with paper towels. Slice into coins or spears if needed (about 2-3 inches long).
- Preheat a nonstick skillet over medium heat. Lightly spray with cooking spray or add 1/2 tsp butter.
- Place a slice of cheese (or about 1 oz shredded) directly on the pan. Let melt and bubble until edges turn golden and crispy, about 30-45 seconds.
- Carefully set a dry pickle spear or coin in the center of the melted cheese. Let sit for a few seconds so cheese wraps around the pickle.
- Using a spatula or tongs, gently fold the cheese around the pickle. Press lightly to seal. Cook another 30-60 seconds until cheese is deep golden and crisp.
- Transfer chickle to a plate lined with paper towels. Let cool for 1 minute to set and crisp.
- Wipe pan with a clean paper towel between batches to avoid burnt bits. Repeat steps for as many chickle as desired.
- Sprinkle with garlic powder, pepper, or your favorite seasoning while hot. Serve immediately.
Notes
Pat pickles dry thoroughly to prevent soggy cheese. Use medium heat for best crisping. Wipe pan between batches for optimal results. Cheese choice affects crunch—cheddar and provolone work best. For variations, add jalapeño, ham, or use vegan cheese. Chickle is best served fresh and hot.
- Prep Time: 3 minutes
- Cook Time: 5 minutes
- Category: Snack
- Cuisine: American
Nutrition
- Serving Size: 1 chickle
- Calories: 90
- Sodium: 320
- Fat: 7
- Saturated Fat: 4
- Carbohydrates: 2
- Protein: 5
Keywords: chickle, cheese-wrapped pickles, crispy cheese, keto snack, gluten-free snack, viral snack, easy appetizer, low carb, party snack, movie night