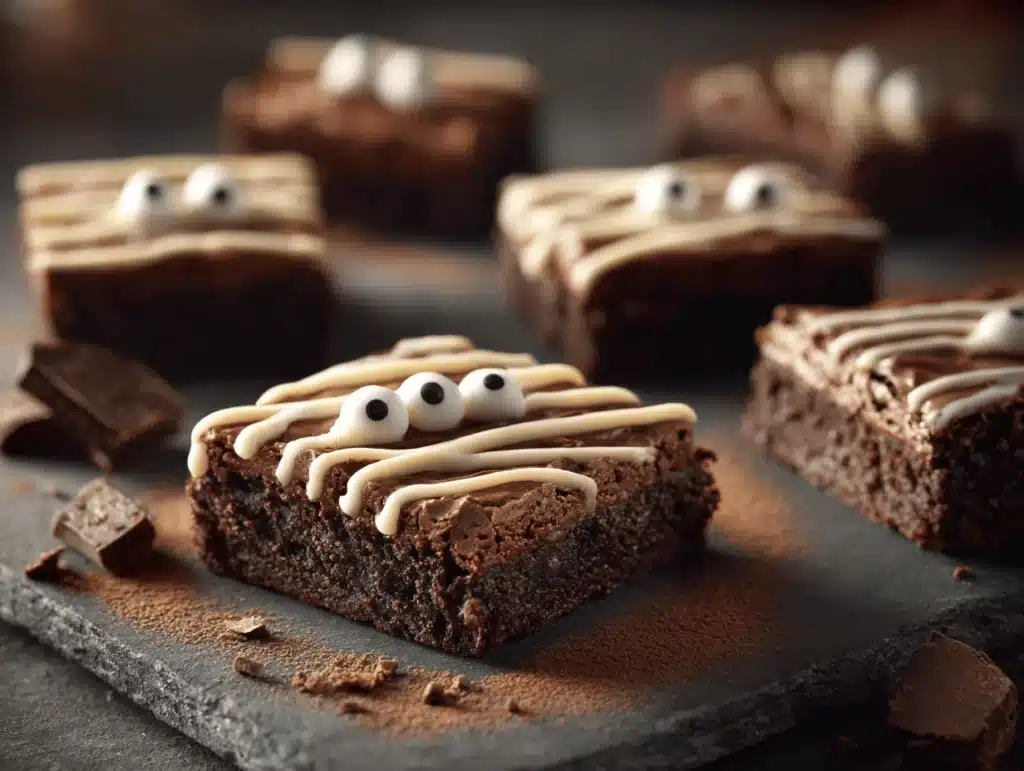
The first bite of a fudgy, chocolatey mummy brownie instantly brings me back to those wild neighborhood Halloween parties—kids running around in costumes, tables covered in spooky snacks, and that unmistakable aroma of rich brownies wafting from the kitchen. There’s just something magical about Halloween treats that look as fun as they taste. Honestly, these easy spooky mummy brownies have become my go-to every October. The whole process—from swirling the icing bandages to dotting on candy eyes—feels like a creative craft project, but the end result is pure dessert bliss.
I first whipped up a batch of these mummy brownies when my oldest begged for “something creepy but not gross” for his class party. You know how picky kids can be! I needed something cute, chocolatey, and easy enough to make after work. That’s when this mummy brownies recipe was born. It’s now a family tradition (even my husband gets in on the decorating), and let’s face it, they disappear faster than any candy in our house.
What I love most about spooky mummy brownies is how they blend festive fun with familiar flavors. The rich chocolate base is just classic comfort food, while the playful mummy design makes them a total showstopper for gatherings. If you’re a parent, a busy baker, or just a Halloween enthusiast, this recipe checks all the boxes—quick to make, kid-approved, and ideal for creating Instagram-worthy treats (seriously, they look amazing on a Halloween dessert table!). After testing and tweaking this recipe multiple times, I’m confident you’ll love it as much as we do. Let’s get into how to make these easy mummy brownies—the Halloween treat kids adore!
Why You’ll Love This Easy Spooky Mummy Brownies Recipe
Over the years, I’ve made dozens of Halloween treats, but these easy mummy brownies stand out for so many reasons. Not only have they passed the “picky eater” test in my house, but they’ve also become a hit at every school party, potluck, and family movie night in October. Here’s why you’ll want this recipe in your Halloween arsenal:
- Quick & Simple: Ready in under 40 minutes, including decorating time. Perfect for those last-minute party plans or when you need a fun baking activity for the kids.
- Minimal Ingredients: You can use a boxed brownie mix or make your favorite homemade recipe—either way, it’s pantry-friendly and no special shopping required.
- Ideal for Parties: These mummy brownies are a total crowd-pleaser at Halloween gatherings, school events, and even office parties.
- Kid-Friendly: Children love helping with the decorating, and the finished treats are always a hit. Candy eyes and zigzag icing are super fun for little hands.
- Unforgettable Presentation: The mummy design is eye-catching and just the right amount of spooky—cute, not scary!
What makes my mummy brownies recipe different? For starters, I use a simple piping technique for the “bandages” and always opt for extra fudgy brownies. (Trust me, a moist center makes the whole treat irresistible.) I also have a trick for keeping the icing smooth and white—no dull bandages here! And if you’re worried about baking skills, don’t sweat it. This method is totally forgiving, even if you’ve never piped icing before.
But honestly, it’s not just about the look. The flavor is rich, chocolatey, and just sweet enough. It’s comfort food with a playful twist, which is what makes Halloween baking so special. You get a dessert that’s delicious, creative, and memorable—without hours in the kitchen. Whether you’re a baking newbie or a seasoned pro, these easy spooky mummy brownies will steal the show and earn rave reviews from every ghost and ghoul in your house!
Ingredients Needed for Easy Spooky Mummy Brownies
This mummy brownies recipe keeps things simple and fun. Most of these ingredients are probably already in your pantry—and if not, there’s plenty of room for swaps. Here’s what you’ll need:
- For the Brownies:
- Boxed brownie mix (18 oz/510g) (or your favorite homemade recipe)
- Large eggs (2, room temperature)
- Vegetable oil (1/2 cup / 120ml)
- Water (1/4 cup / 60ml)
- Optional: chocolate chips (1/2 cup / 90g for extra fudginess)
- For Decorating:
- White icing or frosting (1 cup / 120g, store-bought or homemade)
- Candy eyes (about 24 pairs for a 9×13-inch pan of brownies)
- Optional: black gel icing (for extra facial detail)
Ingredient Tips:
- Brownie Mix: I usually grab Ghirardelli or Duncan Hines for boxed mixes—both have a great texture. If you want to go homemade, use your go-to fudgy brownie recipe.
- Eggs: Room temperature eggs mix better and give a smoother batter.
- Vegetable Oil: Can be swapped for melted butter for a richer flavor.
- White Icing: Look for “bright white” icing if you want the bandages to pop. I’ve used Wilton and Betty Crocker brands with good results. Homemade buttercream works great too—just beat until extra fluffy.
- Candy Eyes: You can find these in the baking aisle during the fall, or order online. If you can’t find them, mini chocolate chips work in a pinch.
- Optional Mix-Ins: Chopped nuts, mini marshmallows, or caramel bits add a fun twist if you want to jazz up the brownies.
- Substitutions: For gluten-free, use a GF brownie mix. Dairy-free? Swap oil for coconut oil, and use plant-based icing.
Everything here is flexible—if you’re missing something, don’t stress. Halloween is all about creativity, and these mummy brownies are super forgiving. Just make sure you have the basics: brownies, white icing, and candy eyes. The rest is up to you!
Equipment Needed
Making easy spooky mummy brownies doesn’t require fancy gadgets—just a few kitchen staples and some optional extras if you want to get creative:
- 9×13-inch baking pan (or an 8×8-inch for thicker brownies)
- Mixing bowl (large enough for brownie batter)
- Whisk or electric mixer (I usually stick to a whisk for boxed mixes)
- Spatula (for scraping the bowl and spreading batter)
- Wire cooling rack (helps brownies cool evenly)
- Piping bag or zip-top bag (for the icing bandages)
- Small round tip (Wilton #3 or #4 for best mummy stripes)
- Offset spatula or butter knife (for loosening brownies from the pan)
Alternative Tools: No piping bag? No problem—snip the corner off a zip-top bag and squeeze gently for bandages. If you don’t have a wire rack, just cool in the pan longer. I’ve made these in glass, metal, and even silicone pans—just adjust the baking time as needed. For easy cleanup, line your pan with parchment paper.
Budget Tips: Most equipment is reusable and affordable. I’ve picked up piping tips at dollar stores and found candy eyes at big-box retailers for cheap. If you bake often, investing in a good quality pan makes all the difference (less sticking, more even browning!).
Preparation Method
Ready to make your easy spooky mummy brownies? Here’s my step-by-step method, including tips for getting the best texture and a truly haunting look:
- Preheat and Prep: Set your oven to 350°F (175°C). Line your baking pan with parchment paper, leaving a slight overhang for easy removal.
- Mix the Batter: In a large bowl, combine your boxed brownie mix (or homemade dry ingredients), 2 eggs, 1/2 cup (120ml) vegetable oil, and 1/4 cup (60ml) water. Whisk until smooth—don’t overmix, or your brownies might get tough. If adding chocolate chips (1/2 cup / 90g), fold them in gently.
- Bake: Pour batter into the prepared pan and spread evenly. Bake for 25-30 minutes for a 9×13 pan, or 35-40 minutes for an 8×8 pan. Check doneness by inserting a toothpick—it should come out with a few moist crumbs, not wet batter. (Don’t worry if the top cracks a bit, the icing will cover it!)
- Cool Completely: Place the pan on a wire rack and let brownies cool for at least 1 hour. If you try to decorate too soon, the icing will melt and run—trust me, I’ve learned this the hard way!
- Cut into Bars: Lift brownies from the pan using the parchment overhang. Cut into 12-24 bars, depending on your preferred size. Wipe your knife between cuts for clean edges.
- Prep Icing: Scoop 1 cup (120g) white icing into a piping bag fitted with a small round tip (or use a zip-top bag and snip the corner). Practice a few stripes on parchment if you’re new to piping.
- Decorate: Pipe zigzag lines across each brownie to mimic mummy bandages. No need for perfection—wonky lines look authentic! Leave space at the top for eyes.
- Add Eyes: Place two candy eyes near the top of each brownie. Press gently so they stick but don’t sink into the icing.
- Optional Details: Add a tiny dot of black gel icing for mouths or extra facial features. Or just stick with eyes—less is more sometimes.
- Set Icing: Allow brownies to sit uncovered for 20 minutes so the icing firms up. If you’re in a rush, pop them in the fridge for 10 minutes.
Troubleshooting:
- If brownies stick to the pan, loosen edges with an offset spatula and use parchment for easy lifting.
- If icing is too thick, stir in a drop of milk. Too runny? Add powdered sugar.
- Candy eyes not sticking? Add a tiny dab of icing as glue.
Efficiency Tips: Bake brownies a day ahead and decorate right before serving. Get the kids involved—they love “bandaging” their own mummies!
Cooking Tips & Techniques
After years of Halloween baking (and a fair share of kitchen mishaps), I’ve picked up a few tricks to guarantee spooky mummy brownies that look and taste awesome:
- Don’t Overbake: Fudgy brownies are best! Start checking at the minimum time—dry brownies just aren’t as fun.
- Room Temp Ingredients: If you use homemade batter, make sure eggs are room temp for even mixing. Cold eggs can cause the batter to seize up.
- Clean Cuts: For sharp brownie edges, chill brownies before cutting and wipe your knife after each slice. I’ve rushed and ended up with crumbly squares (still tasty, but less Pinterest-worthy!).
- Piping Practice: New to piping? Try a few test stripes on wax paper before decorating actual brownies. If your icing clogs, poke the tip with a toothpick.
- Multitasking: While brownies cool, prep your icing and candy eyes. If you’re hosting a party, set up a “decorating station”—kids love it, and cleanup is easier.
- Consistency: Use the same amount of icing for each brownie. It helps the mummies look like a matching set, even if the bandages are a little wonky. (Honestly, imperfections make them cuter!)
- Eye Placement: Don’t sweat it if eyes are crooked or uneven—each mummy has its own personality. If you run out of candy eyes, mini chocolate chips work too.
- Lesson Learned: Once I tried decorating warm brownies, and the icing slid right off. Always cool completely!
Keeping things simple and fun is key. Halloween baking should be a joy, not a stress-fest. Don’t worry about making perfect mummies—just enjoy the process and the smiles when everyone digs in!
Variations & Adaptations
The beauty of mummy brownies is how easy they are to customize. You can tweak this recipe for any diet, flavor craving, or spooky theme. Here are some fun ways to make it your own:
- Gluten-Free Mummy Brownies: Use your favorite gluten-free brownie mix. All decorating steps stay the same!
- Dairy-Free Option: Swap vegetable oil for coconut oil, and use dairy-free frosting. Most candy eyes are dairy-free, but double-check labels.
- Halloween Flavors: Stir in orange zest or pumpkin spice for a seasonal twist. Try swirling caramel into the batter for a “gooey mummy” effect.
- Different Cooking Methods: Bake in mini muffin pans for “mummy bites,” or use a silicone mold for fun shapes.
- Allergen Substitutions: Egg allergy? Use flaxseed “eggs” (1 tbsp ground flax + 2.5 tbsp water per egg). Nut allergy? Skip mix-ins like nuts or nut-based toppings.
- Personal Variation: Last year, I swapped regular icing for a marshmallow cream drizzle—super sticky but crazy delicious. Kids loved the extra gooey “bandages.”
Don’t be afraid to get creative. Make your mummies scary, silly, or even add colored icing for a “monster mash” effect. It’s Halloween—let your imagination run wild!
Serving & Storage Suggestions
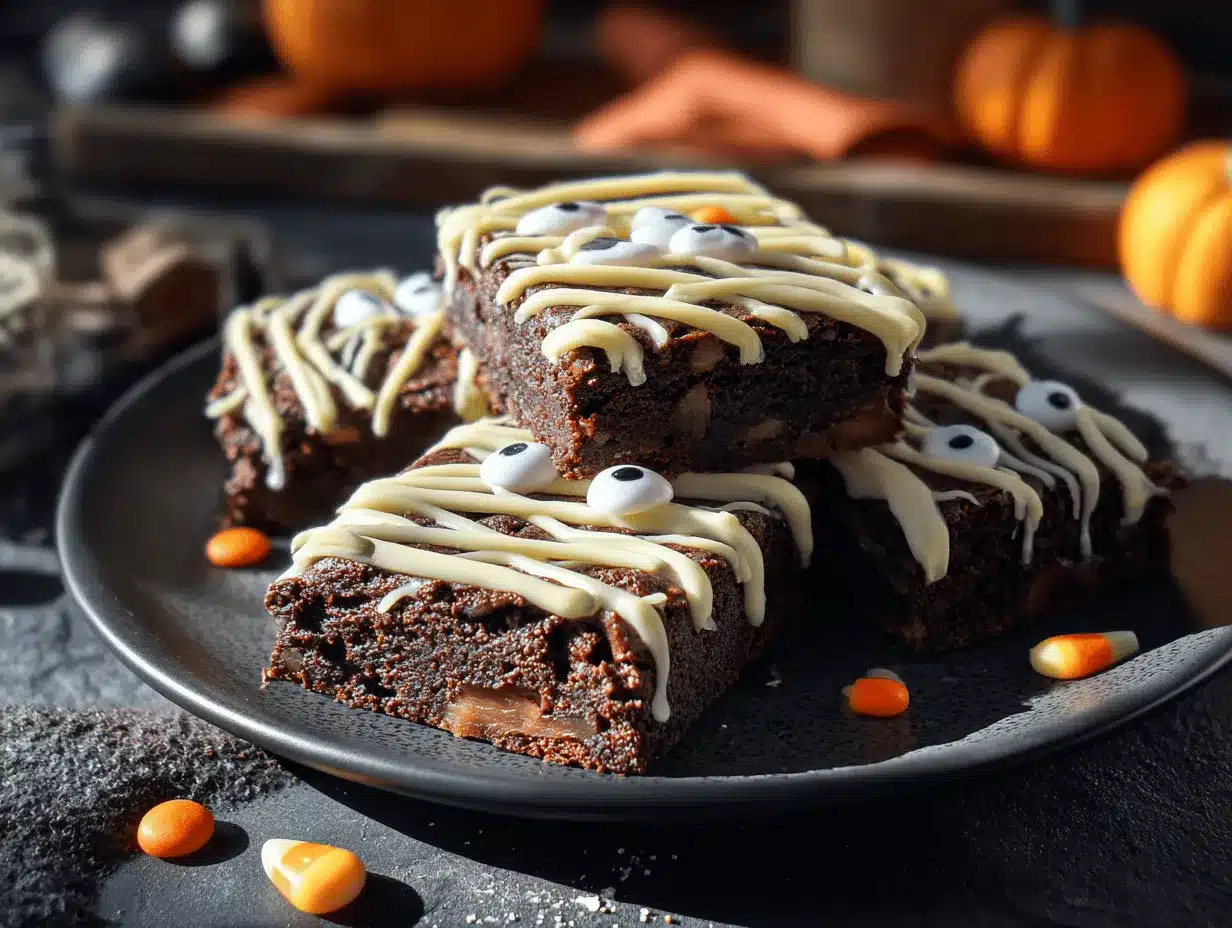
These easy spooky mummy brownies are best served at room temperature—the icing stays soft and the brownie texture is just right. Arrange them on a platter with a few plastic spiders or Halloween confetti for extra party flair.
Serving Tips:
- Pair with apple cider, hot chocolate, or “witches’ brew” punch for a festive spread.
- Add other Halloween treats like ghost cupcakes or pumpkin cookies for a dessert table that pops.
- If you want extra drama, stack mummy brownies in a pyramid—kids love grabbing them from the “mummy mountain!”
Storage:
- Brownies keep in an airtight container at room temp for 3-4 days.
- Refrigerate for up to a week, but let them come to room temp before serving—icing softens nicely.
- Freeze undecorated brownies for up to 2 months. Thaw and decorate fresh for best results.
- To reheat, microwave for 10-15 seconds (skip this if decorated—icing might melt). Honestly, they’re pretty tasty cold too.
Flavors tend to deepen after a day, so leftovers are extra rich and chocolatey. If you’re prepping ahead for a party, decorate the day you serve for sharp bandages and bright eyes.
Nutritional Information & Benefits
Each mummy brownie (based on a 24-bar batch) is approximately:
- Calories: 150
- Fat: 7g
- Carbohydrates: 23g
- Protein: 2g
- Sugar: 16g
Health Notes:
- Brownies are a treat—best enjoyed in moderation. They’re nut-free as written, but always check mix-ins and candy eyes for allergens.
- You can make them gluten-free or dairy-free with simple swaps.
- Cocoa provides antioxidants, and eggs add a bit of protein.
From my nutrition coach experience, I always say: balance is key. Enjoy these spooky mummy brownies as part of your Halloween celebration, and focus on the fun!
Conclusion
So, why should you try these easy spooky mummy brownies? They’re the perfect blend of chocolatey comfort and festive creativity—quick to make, fun to decorate, and guaranteed to wow both kids and adults. I genuinely look forward to baking these every October, and they always bring smiles (and a little laughter at the wonky mummies!) to our holiday table.
Don’t be afraid to put your own spin on the recipe—swap flavors, adjust decorations, or let the kids help. That’s what makes Halloween baking so special. If you make these mummy brownies, please share your results in the comments or tag me on social media. I love seeing your spooky creations!
Happy haunting, happy baking, and may your kitchen be filled with laughter and lots of chocolate. You’ve got this—go make some memories with the best Halloween treat around!
FAQs About Easy Spooky Mummy Brownies
Can I use homemade brownie batter instead of a boxed mix?
Absolutely! Just use your favorite fudgy brownie recipe and follow all the decorating steps. Homemade brownies work great for this mummy brownies recipe.
Where can I find candy eyes for decorating?
Most grocery stores carry them in the baking aisle during Halloween season. If not, check online retailers or use mini chocolate chips as a substitute.
What’s the best way to pipe the mummy bandages if I don’t have a piping bag?
Just fill a zip-top bag with icing, snip a small corner, and pipe zigzag lines. It’s easy and mess-free—perfect for beginners!
How far in advance can I make mummy brownies?
You can bake brownies up to two days ahead and decorate the day you plan to serve. Store in an airtight container for maximum freshness.
Can I freeze mummy brownies?
It’s best to freeze undecorated brownies. Thaw, then decorate with icing and candy eyes for the freshest look and taste.
Pin This Recipe!
Mummy Brownies Recipe: Easy Halloween Treats Kids Love
- Total Time: 40 minutes
- Yield: 12-24 brownies 1x
Description
These fudgy, chocolatey mummy brownies are a festive Halloween treat that’s quick to make, fun to decorate, and always a hit with kids and adults alike. With simple ingredients and playful candy eyes, they’re perfect for parties, school events, or spooky family nights.
Ingredients
- 1 box brownie mix (18 oz)
- 2 large eggs, room temperature
- 1/2 cup vegetable oil
- 1/4 cup water
- Optional: 1/2 cup chocolate chips
- 1 cup white icing or frosting (store-bought or homemade)
- 24 pairs candy eyes (for a 9×13-inch pan)
- Optional: black gel icing for facial detail
Instructions
- Preheat oven to 350°F (175°C). Line a 9×13-inch baking pan with parchment paper, leaving an overhang for easy removal.
- In a large bowl, combine brownie mix, eggs, vegetable oil, and water. Whisk until smooth; do not overmix. Fold in chocolate chips if using.
- Pour batter into prepared pan and spread evenly.
- Bake for 25-30 minutes (for 9×13 pan) or 35-40 minutes (for 8×8 pan). Check doneness with a toothpick; it should come out with a few moist crumbs.
- Cool brownies completely in the pan on a wire rack for at least 1 hour.
- Lift brownies from pan using parchment overhang. Cut into 12-24 bars, wiping knife between cuts for clean edges.
- Scoop white icing into a piping bag fitted with a small round tip (or use a zip-top bag with the corner snipped).
- Pipe zigzag lines across each brownie to mimic mummy bandages, leaving space at the top for eyes.
- Place two candy eyes near the top of each brownie, pressing gently.
- Optional: Add a dot of black gel icing for mouths or extra facial features.
- Let brownies sit uncovered for 20 minutes to allow icing to firm up, or refrigerate for 10 minutes if in a rush.
Notes
For gluten-free or dairy-free adaptations, use appropriate brownie mix and icing. Brownies are best decorated after cooling completely. Kids love helping with the decorating—imperfections add character! Store in an airtight container for up to 4 days at room temperature or freeze undecorated brownies for up to 2 months.
- Prep Time: 10 minutes
- Cook Time: 30 minutes
- Category: Dessert
- Cuisine: American
Nutrition
- Serving Size: 1 brownie bar (out of 24)
- Calories: 150
- Sugar: 16
- Sodium: 90
- Fat: 7
- Saturated Fat: 2
- Carbohydrates: 23
- Fiber: 1
- Protein: 2
Keywords: mummy brownies, Halloween treats, easy brownies, kid-friendly dessert, spooky brownies, party dessert, chocolate brownies, Halloween baking